Linux Kernel Rust Development Environment
The memory management on the PowerPC can be used to frighten small children.
– Linus Torvalds
First of all this post has a soundtrack. Please play it while reading.
I have been working on a project to develop a Linux kernel module in Rust, but I found it difficult to find a good tutorial on how to set up the development environment. So I decided to write this as a tutorial for myself and for anyone else who might find it useful.
Install Dependencies and the rust toolchain
I am using arch BTW an archlinux machine, but the steps
should be similar for other distros.
Also, I’m considering that some of the packages are already installed, like
git and make for example (So, if you got some errors, please install the
missing packages).
Install the following packages:
sudo pacman -S -y --needed gdb qemu flex bison llvm llvm-libs clang libelf lld rustup rust-analyzer cpio gzip git make
NOTE: If you are using a different distro, please install the equivalent packages and the rust toolchain using rustup.
Clone the Linux Kernel and Busybox
First, make a kernel directory and clone the linux kernel source code and the
busybox source code. This step might take a while, so go grab a coffee.
mkdir kernel && cd kernel
git clone git@github.com:Rust-for-Linux/linux.git
git clone git@github.com:mirror/busybox.git
Building the Kernel with Rust Support
Enter the linux kernel directory:
cd linux
Check rust environment
First, we need to set the correct version of the rust toolchain:
rustup override set $(scripts/min-tool-version.sh rustc)
rustup component add rust-src rustfmt clippy
cargo install --locked --version $(scripts/min-tool-version.sh bindgen) bindgen
Check if your rust environment is setup correctly by running the following
command (If everything is ok, you should see Rust is available):
make LLVM=1 rustavailable
If something is wrong, please use your favorite search engine to find the solution.
Now, all the rust options in the kernel should be visible.
Configure and build the Kernel
Now, we need to configure the kernel to enable Rust support. To do that, enter the following commands:
make LLVM=1 allnoconfig qemu-busybox-min.config rust.config
Open the configuration menu:
make LLVM=1 menuconfig
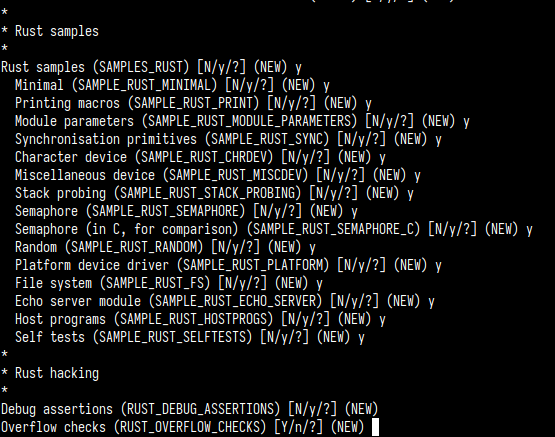
And enable the following options:
General setup -> Rust supportKernel hacking -> Sample Kernel code -> Rust samples -> [all of them]

Also, enable the KUnit support and KUnit test framework:
Kernel hacking -> Kernel testing and coverage -> KUnitKernel hacking -> Rust hacking -> KUnit test for the kernel crate
After, enable the Loadable module support:
Finally, we can build the kernel:
yes "" | make LLVM=1 -j$(nproc)
The yes "" will answer the default value to the all questions in the build
process (including the rust related ones).
Configure and build busybox
Cd into the busybox directory:
cd ../busybox
We need to compile busybox statically, so we need to enable the static option:
make menuconfig
Now check the Settings -> Build static binary (no shared libs) option and save
the configuration:

Now, we can build busybox:
make -j$(nproc)
Install the binaries to ./_install directory:
make install
Configuring the rootfs
Now, in the ./_install directory, we need to create the following directories:
cd _install
mkdir -p usr/share/udhcpc/ etc/init.d/
With those dirs created, we can create the etc/init.d/rcS init script:
cat <<EOF > etc/init.d/rcS
mkdir -p /proc
mount -t proc none /proc
ifconfig lo up
ifconfig eth0 up
udhcpc -i eth0
mount -t devtmpfs none /dev
mkdir -p /dev/pts
mount -t devpts nodev  /dev/pts
telnetd -l /bin/sh
EOF
chmod a+x etc/init.d/rcS bin/*
Copy the examples/inittab file to the etc:
cp ../examples/inittab etc/
Copy the examples/udhcpc/simple.script file to the `usr/share/udhcpc/default.script``:
cp ../examples/udhcp/simple.script usr/share/udhcpc/default.script
Creating the rootfs
Now, we can create a cpio image with the rootfs:
find . | cpio -o -H newc | gzip -9 > ./rootfs.img
Wrapping all up in a Virtual Machine using QEMU
Now, we can successfully run the kernel with the rootfs in a virtual machine using QEMU:
cd ../..
qemu-system-x86_64 \
    -kernel linux/vmlinux \
    -initrd busybox/_install/rootfs.img \
    -nographic \
    -machine q35 \
    -enable-kvm \
    -device intel-iommu \
    -cpu host \
    -m 4G \
    -nic user,model=rtl8139,hostfwd=tcp::5555-:23,hostfwd=tcp::5556-:8080
You should see something like this:
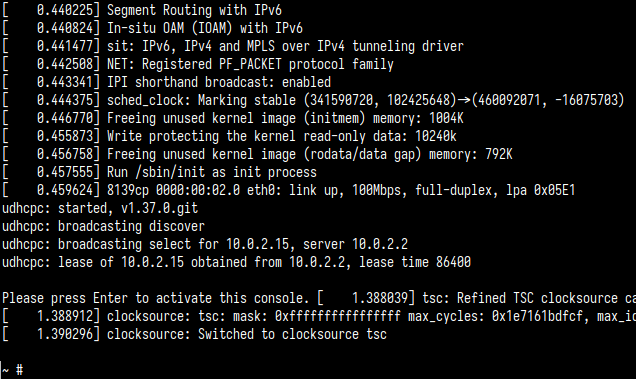
Meaning that the kernel is running and the rootfs is mounted. Now, we can connect from the host to the virtual machine using telnet:
telnet localhost 5555
Hackin’ on the Kernel
For diving into the kernel code, look at the examples in the samples/rust
directory and the Rust hacking menu in the kernel (after Kernel hacking).
For example, we enabled the rust_echo_server sample module in previous steps.
So, you can connect to the echo server using telnet from the host:
# telnet localhost 8080 (from the guest)
telnet localhost 5556
The echo server is a very interesting example, because it shows how to use the
async/await syntax in the kernel:
// SPDX-License-Identifier: GPL-2.0

//! Rust echo server sample.

use kernel::{
    kasync::executor::{workqueue::Executor as WqExecutor, AutoStopHandle, Executor},
    kasync::net::{TcpListener, TcpStream},
    net::{self, Ipv4Addr, SocketAddr, SocketAddrV4},
    prelude::*,
    spawn_task,
    sync::{Arc, ArcBorrow},
};

async fn echo_server(stream: TcpStream) -> Result {
    let mut buf = [0u8; 1024];
    loop {
        let n = stream.read(&mut buf).await?;
        if n == 0 {
            return Ok(());
        }
        stream.write_all(&buf[..n]).await?;
    }
}

async fn accept_loop(listener: TcpListener, executor: Arc<impl Executor>) {
    loop {
        if let Ok(stream) = listener.accept().await {
            let _ = spawn_task!(executor.as_arc_borrow(), echo_server(stream));
        }
    }
}

fn start_listener(ex: ArcBorrow<'_, impl Executor + Send + Sync + 'static>) -> Result {
    let addr = SocketAddr::V4(SocketAddrV4::new(Ipv4Addr::ANY, 8080));
    let listener = TcpListener::try_new(net::init_ns(), &addr)?;
    spawn_task!(ex, accept_loop(listener, ex.into()))?;
    Ok(())
}

struct RustEchoServer {
    _handle: AutoStopHandle<dyn Executor>,
}

impl kernel::Module for RustEchoServer {
    fn init(_name: &'static CStr, _module: &'static ThisModule) -> Result<Self> {
        let handle = WqExecutor::try_new(kernel::workqueue::system())?;
        start_listener(handle.executor())?;
        Ok(Self {
            _handle: handle.into(),
        })
    }
}

module! {
    type: RustEchoServer,
    name: "rust_echo_server",
    author: "Rust for Linux Contributors",
    description: "Rust tcp echo sample",
    license: "GPL v2",
}
You can find more samples in the samples/rust directory. Go ahead and hack’em.
Using rust-analyzer and other tools for a better development experience
The kernel has a rust-analyzer target for generating the rust-project.json
file. This file is used by the
rust-analyzer, so, running the following
command will generate the rust-project.json file:
make LLVM=1 rust-analyzer
I won’t go into details about how to use the rust-analyzer in your editor, or
what a LSP is, but you can find more information in the
rust-analyzer website. Also, you can easily
find plugins for your favorite editor, like vscode, neovim, etc.
Also, you can generate the rust docs for the kernel using the following command:
make LLVM=1 rustdoc
The generated docs will be in the rust/doc/kernel/index.html file.
For checking source code style, you can use the rustfmtcheck target:
make LLVM=1 rustfmtcheck
For fixing the source code style, you can use the rustfmt tool:
make LLVM=1 rustfmt
For running the tests, you can use the rusttest target:
make LLVM=1 rusttest
You can also run all targets with tthe CLIPPY=1 environment variable. So, in this way, you can lint all the code:
make LLVM=1 CLIPPY=1 -j8
References
- Rust for Linux Documentation
- Rust for Linux GitHub Repository
- Wedson Almeida’s talk about Rust development environment for the Linux kernel
- A Funky Chinese Blog Post